| Astrophotography Help |
| I have set this page up to use as a file repository for questions and file posting that will allow me to get or provide help to others hobbyists. You can reach me at mdemita@comcast.net or on CloudyNights forum as MadMan Mike |
Homemade laser collimation for SX cameras.
Could be much improved on but this took 1 hour and I wanted to get it done before a dark sky trip. Below are the 'ingredients' - and it works for now quite well. This
proves that using a equi-gap method of collimating SX cameras is NOT a good place to start as the gaps between the body and the tip/tilt plate at the collimation screws vary
greatly when the camera is perfectly collimated. The CCD is installed in SX cameras on double sided tape and thus varies in position enough to make this a worthwhile
proejct!
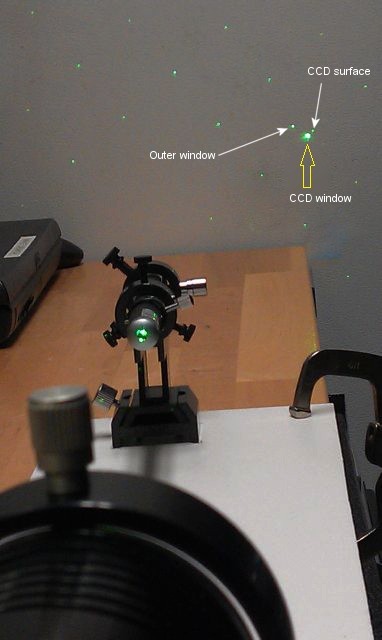
Per the picture below, the objective is to get the bright spot highlighted with the yellow arrow not to rotate as you rotate the camera. Make your own with.....
- a green laser pen with a finder type holder or just laid and taped to a block of wood and pointed right at the CCD face (shutter must be open if present)
- A couple of 75 mm finder rings (ADM makes a great set)
- A 2" nosepiece and 40 mm Baader or other extension
- A way to hold the rings securely to a board (I used a spare vixen dovetail and some clamps)
- A wall to project onto (or a piece of paper if you don't want to piss off your wife for drawing on the spare fridge I have in the garage)
- 2.5 and 2mm ball drivers (much easier to get at the screws than allens to make 'on the fly' adjustments)
- A pencil :)
Loosen the set screws. Tighten the camera pretty well in the rings and rotate the camera while applying a little forward pressure in the direction that WON'T cause the
nose piece to unscrew :). Adjust the tip/tilt plate silver collimation screws (after loosening the set screws) as you rotate the camera slowly to try and center the close dim
spot next to the brightest spot. See marked image below. Don't forget to re-tighten (just snug) your set screws when done. No more star trails in the corner of your images
(unless something else is amiss).
HAPPY COLLIMATING!!!!!!!!!!!!
Could be much improved on but this took 1 hour and I wanted to get it done before a dark sky trip. Below are the 'ingredients' - and it works for now quite well. This
proves that using a equi-gap method of collimating SX cameras is NOT a good place to start as the gaps between the body and the tip/tilt plate at the collimation screws vary
greatly when the camera is perfectly collimated. The CCD is installed in SX cameras on double sided tape and thus varies in position enough to make this a worthwhile
proejct!
Per the picture below, the objective is to get the bright spot highlighted with the yellow arrow not to rotate as you rotate the camera. Make your own with.....
- a green laser pen with a finder type holder or just laid and taped to a block of wood and pointed right at the CCD face (shutter must be open if present)
- A couple of 75 mm finder rings (ADM makes a great set)
- A 2" nosepiece and 40 mm Baader or other extension
- A way to hold the rings securely to a board (I used a spare vixen dovetail and some clamps)
- A wall to project onto (or a piece of paper if you don't want to piss off your wife for drawing on the spare fridge I have in the garage)
- 2.5 and 2mm ball drivers (much easier to get at the screws than allens to make 'on the fly' adjustments)
- A pencil :)
Loosen the set screws. Tighten the camera pretty well in the rings and rotate the camera while applying a little forward pressure in the direction that WON'T cause the
nose piece to unscrew :). Adjust the tip/tilt plate silver collimation screws (after loosening the set screws) as you rotate the camera slowly to try and center the close dim
spot next to the brightest spot. See marked image below. Don't forget to re-tighten (just snug) your set screws when done. No more star trails in the corner of your images
(unless something else is amiss).
HAPPY COLLIMATING!!!!!!!!!!!!
| 12/16/11 Update: Home made collimation setup further results - After aligning using the brightest spot in my test images below such that it did not move while rotating the camera, I still had a uniform tilt to my CCD Inspector results. I suspected that if I lessened the angle between the laser and the CCD (made it more perpendicular), it might be better. It did and I now have a perfectly collimated camera. I moved the pen such that it almost eliminated the angle while still allowing the beam to pass to the side of the pen and onto a projection wall some 4 feet away. Projecting onto a wall provides more accuracy than the roofing shingle did. Good luck! |
| Original Angle - beam to CCD surface - Collimation Results |
| Significantly Lessened Angle Collimation Results. Could be just luck and not the angle - but I do think CCD inspector works well based on just looking at how the image brightned and tightened. |


| 20 second image of Messier 35. Tak 106 fsq at prime. No changes to focus or setup between pictures. Only one image was taken with each attempted collimation (other than a wrong exposure in between) and the 2nd results were achieved on the first try (colltest3). |


| To the right: the original 'all wood' testing platform. Televue Extension instead |

| Files Section: |


| The objective is to get the CCD surface spot to center when the camera is spun. Below is my current collimation rig with my 60Da doing 4 second exposure while I spun the camera. Collimation is almost perfect (images right) I think or I would see 3 circles in the center. |


